
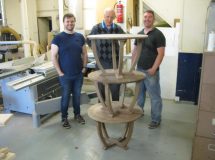
Router skills project piece.
I’ve been working on developing a new course this week. On various of my courses we use a router for particular tasks, but I don’t have a course specifically devoted to routing techniques. Many students have said that they have a router but are not confident in using it, so I have decided to introduce a five day router skills course. There’s quite a lot of work involved in developing a new course here are some insights into the process.
- Decide what you want to teach. Sounds simple, but even on a five day course there are time constraints, so I have to decide which of the router’s many possibilities are the most useful for students and also ensure they know how to use it safely. So on this course some of the topics covered will be:
o Choice of router.
o Dust extraction.
o Cutter types.
o Safety.
o Setting of fence and depth stop.
o Importance of feed direction for both quality of cut and safety.
o Grooving.
o Rebating.
o Moulding.
o Mortice and tenoning.
o Cutting a halving joint.
o Creating and using jigs and templates.
o Inlaying.
o Using a trammel.
o Setting up and using a router table.
• Design a course project. On my longer courses I usually base the teaching round the making of a piece of furniture. For instance a small table on my beginners course, a curved stool on veneering and laminating. On this course the first day will be simple instruction on technique the remaining four days are for making a piece. The question is what to make in four days that will involve most of the functions of the router and be at a suitable level for those with little routing experience?
I decided on a low circular table with curved legs and an inlaid top, making should include all the elements mentioned above. The design was developed using the drawing package Sketchup.

Computer drawn (Sketchup) design for course table.
• Make a prototype. I make a prototype for a number of reasons:
o I can show students what they will be making and they can use the prototype as a reference whilst making theirs.
o I can get a firm idea of timings for each task.
o I can take pictures of the making process for the handout.
o I can make the necessary jigs and templates for the job.
o I can identify safety issues and address them by making jigs or fixtures.

Jigs and templates made whilst creating prototype.
• Write the handouts. Those who have been on my courses know that my handouts are quite comprehensive and well illustrated. They are usually on CD, mainly because they are quite large, the cabinet making course handout runs to twenty pages For long courses I usually write one handout for techniques and another describing the making of the course project.
So, you can see that there is quite a lot of work in developing a new course. All I need then is for students to sign up for it!


2 Comments
Elegant solutions are the best. » Chris Tribe Furniture courses - Woodwork courses for all abilities.
2nd November 2014[…] are the best. This was brought home to me when gluing up the legs on the table mentioned in my previous blog. The legs were a complex shape, curving in towards the centre. I thought I would be able to clamp […]
Router skills » Chris Tribe Furniture courses - Woodwork courses for all abilities.
6th November 2014[…] have blogged on the way this course was […]